

Install PHP
OK, up to now things have been pretty easy, Apache, MySQL and MySQL Tools have pretty much done all of the work themselves, with a few changes here and there. Now the going gets just a little tougher, we are going to install PHP. There is only one way to do this and that is manually; forget the Windows Binary that comes with a msi (Microsoft Installer now known as Windows Installer) as this does not provide what we want. The msi binary installs PHP as a CGI run application and we want PHP to run as an Apache module. The other problem with the installer version is one of security, and it is for both of these reasons that I recommend installing PHP manually.
Actually we now arrive at the main reason for installing all of the previous applications, without Apache PHP would be useless as it needs the server to operate, and PHP is the language were going to use for development of dynamic web pages. Also it is extremely difficult, if not impossible to create dynamic web pages without a database, which is where MySQL enters the equation; and PHP makes connecting to a database pretty simple.
The first thing we need to do is locate and open the .zip file that we downloaded, then to extract its contents into the C:\server\php\ folder that we created at the beginning of the whole process. This extraction process will create the necessary directory structure within the php folder and you should end up with a directory structure looking like this:-

If one expanded this directory structure to a sort of tree form it would look something like this:-
- c:\server\php\
- +--dev
- -php5ts.lib
- +--ext
- -php_bz2.dll
- -... along with numerous other .dll files
- +--extras
- +--mibs -- support files for SNMP
- - assorted files
- +--openssl -- support files for Openssl
- - assorted files
- +--pdf-related -- support files for PDF
- - assorted files
- -mime.magic
- +--pear -- initial copy of PEAR
- -go-pear.bat -- PEAR setup script
- -fdftk.dll
- -...
- -php-cgi.exe -- CGI executable
- -php-win.exe -- executes scripts without an opened command prompt
- -php.exe -- CLI executable - ONLY for command line scripting
- -...
- -php.ini-dist -- default php.ini settings
- -php.ini-recommended -- recommended php.ini settings
- -php5activescript.dll
- -php5apache.dll
- -php5apache2.dll
- -
- -php5ts.dll -- core PHP DLL
- -...
Now within your php folder create two new folders named uploadtemp and sessiondata. The uploadtemp folder will be a temporary folder to store HTTP uploaded files, and the sessiondata folder will be used for storing all session files. The paths to these folders will read c:\server\php\uploadtemp\ and c:\server\php\sessiondata\ respectively. And, basically, that is PHP installed, it wasnt too painful was it? But, there is still some work to do before everything is as it should be and PHP is fully functioning, next comes the configuration process.
We now need to set up a valid configuration file for PHP, the php.ini file; there are two .ini files distributed with PHP, php.ini-dist and php.ini-recommended. I recommend using the php.ini-recommended as the default settings are optimised for performance and security. The best way to use this file is to open it with Notepad, then save it to c:\server\php\ with the file name php.ini, making very sure that the .txt extension is not included on the end of the file name.
Now we need to re-open the php.ini file that we have just created to make some changes, it will open in Note pad by default now.
Warning: be very careful when making any changes in this file, if you are not sure of the change you are making then it is best not to make it.
The changes one could make to the configuration file are many and varied, and far to complex to be covered in a simple tutorial like this as the descriptions and explanations would be quite lengthy; if you really need to know then the online PHP documentation is the place to look. However, for now, the following changes will be sufficient to get up and running. Find and change the following lines:-
find - ;upload_tmp_dir = and change it to - upload_tmp_dir =c:\server\php\uploadtemp\find - ;session.save_path = "N;/path" and change it to - "session.save_path = "c:\server\php\sessiondata\"find - doc_root = and change it to = doc_root =.c:\server\Apache2\htdocs\find - extension_dir = "./" and change it to - extension_dir = "C:/server/php/ext/"find - ;extension=php_mbstring.dll and change it to - extension=php_mbstring.dllfind - ;extension=php_mysql.dll and change it to - extension=php_mysql.dllfind - ;extension=php_mysqli.dll and change it to - extension=php_mysqli.dll
Warning: be very careful when entering paths like .c:\server\Apache2\htdocs\, and ensure that they are entered exactly as shown above, as even the smallest typo can cause all sorts of problems, and be the very devil to track down. One of the problems I find with typos is that you can be looking at a line with a typo in it and miss it due to the fact that you are seeing what you expect to see. Check everything twice and then check it again for good measure.
Next we need to tell the computer where php.ini is located by setting the path to it. This sounds more complex than it actually is
Start > Control Panel > Performance and Maintenance > System - this will open the System Properties window click on the Advanced tabBy now you should have an array of open windows like that below:-
then click the Environment Variables button
In the lower box locate and highlight Path and click Edit
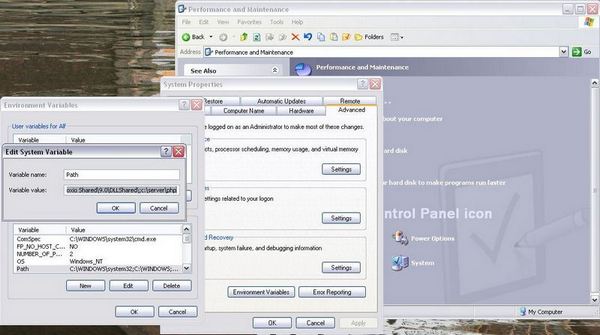
In the Edit System Variable window which should look exactly like the screen below, although without the c\server\php at the end because this is what you are now going to add:-
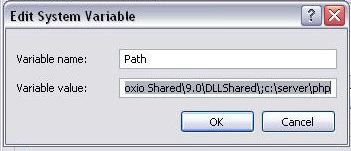
Click in the Variable value: box and go to the end of the string within it, ensuring that it is no longer highlighted, and add c:\server\php\;
Click OK and restart your computer.
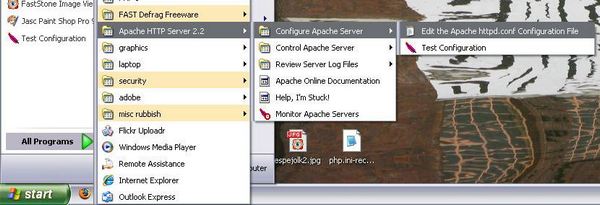
Right, thats the basic configuration of PHP completed, now all we have to do is ensure that Apache knows where to find the files it needs to enable it work with our .php files. To do this we need to open the httpd.conf Apache configuration file, the easiest way to do this is Start > All Programs > Apache HTTP Server 2.2 > Configure Apache Server > Edit the httpd.conf Configuration File - as seen below:-
As this is a plain old text file it will open in Notepad by default, just go to the end of the document and add the following lines:-
LoadModule php5_module "c:/server/php/php5apache2_2.dll"
AddType application/x-httpd-php .php
PHPIniDir "c:/server/php/"
Warning: again ensure that you enter this correctly without typos otherwise Apaches will not recognise your PHP installation.
The first line tells Apache where to find the PHP installation and the relevant .dll file to enable PHP with Apache, the second line tells Apache to recognise .php as a valid file extension, and the third line tells Apache where the php.ini file is located.
All that is left to do now is to Restart Apache using the same method we used earlier when we installed it.
Now all it remains to do is to check that PHP is working properly. For that we need to create a .php file, so open Notepad and type in the following code exactly as it appears here:-
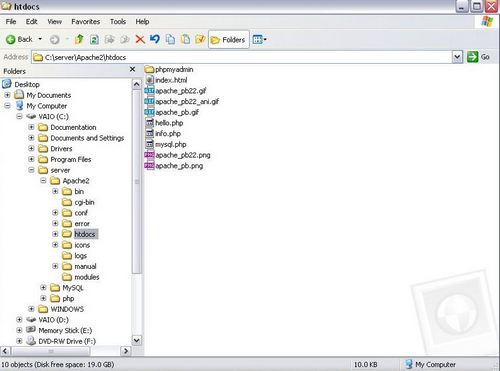
<?phpNow we need to save this file, naming it phpinfo.php again ensuring that there is no .txt extension at the end of the file name. The file has to go in the web root directory of Apache, c:\server\Apache2\htdocs\ as is seen in the screenshot below:-
phpinfo();
?>
Again we need to fire up our favourite browser (as you know I prefer Firefox) and type http://localhost/phpinfo.php into the location address bar. If you see a page that looks like the image below, then you have successfully managed to install and setup PHP correctly on your server.
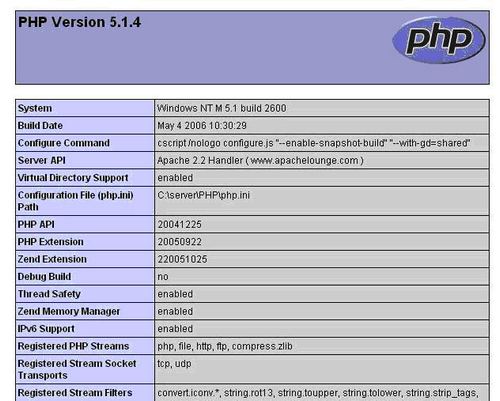
Dont worry if the page you see is not exactly the same as this, as it varies according to how PHP has been configured; as long as this is the sort of result you get that is fine. If this is not the result you get, then I am afraid that you are going to have to work through all of the configuration changes you made to find the error.
Previous < Install MySQL tools - Next > Install phpMyAdmin
![]() Problems viewing the website? Get Firefox! Why? See Here.
Problems viewing the website? Get Firefox! Why? See Here.
Online Manuals
Tutorial in Word & PDF Form
Complete Tutorial .doc format
Complete Tutorial .pdf format
Sample Configuration Files
Sample phpMyAdmin config.inc file
Website designed and maintained by Alf Thomas - all content © Alf's Art 2003-2008